POTTERY AND CERAMICS LESSON PLANS
Here are ideas for pottery and ceramics lesson plans for students of all ages.
Take a lesson... Leave a lesson.
We would like to make this a place to share your plans with other art teachers. Please send your favorite pottery lesson plans to us via email and we will post them here.
Would you like to have a structured semester of clay art education for your students ?
Check out Amaco : Year in Clay!
A complete curriculum with rubrics, power-point presentations, guided lessons and more. ... and it's free!


Lesson Plan : Amaco brings a lesson in virtual clay!
Dive into the new school year with our latest lesson plan featuring Teacher’s Palette glazes! In this video we walk through a simple pointillism process that allows you to use commercial pre-glazed tiles in an innovative way that fulfills National Visual Art and Core Standards.
NEED SOME NEW CLASSROOM ACTIVITIES?
Follow along as we go through our lesson plan that demonstrates how to use an already glaze fired tile and create something new! For this lesson plan we use our Teacher’s Palette Coal Black (TP-1) to paint over the already glazed tile. Once the glaze is dried we go back in and scratch away a contrasting design, also known as sgraffito. If you have extra glaze fired tiles lying around, this is lesson plan is for you! It’s perfect for the classroom or the home!
Materials Needed: Teacher’s Palette Coal Black (Tp-1), Bamboo Brush, Spray Bottle, Pencil, Bamboo Skewer, Glazed Tile
HANDS-ON HISTORY OF POTTERY
LEVEL:
Can be tailored for levels K through 12
MATERIALS:
5 lbs of clay per student. Self Hardening/no-kiln clay and acrylic paints or kiln-fired Mass Red clay and Slip or engobe. or pitfired Wood Light Clay Brushes and/or found objects
SUMMARY:
By having students make pottery in the same evolutionary order as archeology indicates, student can get an excellent introduction to pottery making with an historical perspective. This can be a stand-alone lesson for young students or as a “walk-before-you-run” lesson for high school level students who will be going on to wheel throwing and other advanced techniques.
OBJECTIVES:
Teach the historical evolution of pottery from the most primitive through early advancements. This lesson recreates the first 3000 years of pottery making in one to two hours. Expose students to the feel of clay as experienced from the perspective of pre-historical man through the early tool makers.
DAY 1
PART 1: PINCH POTS
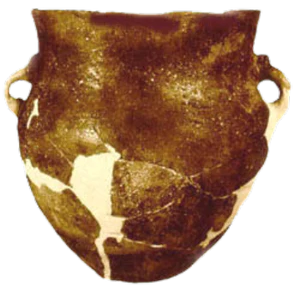
A discussion or the earilest known neolithic pottery pinch pots circa 6000 BC. Illustrating images are shown. Pictured above right: Early pot courtesy Kansas Historical Society. Students of all ages should experience this epoch by forming a cup with no tools. (Please note: Self-Hardening clay products are not considered food-safe. Cups made of Self Hardening Clay are decorative only.)
PART 1.B
Discussion of how the first firings of pottery were, in all likelihood, accidental as early cups fell into campfires. Advanced students can try this with Wood Light Clay and a simple pit fire.
PART 2: COIL BUILDING
A discussion of the coil building technique and primitive tools. Students are instructed to roll out their clay into long snakes. Coiled pot shapes are made. Students may then be given simple tools such as wooden rulers. Advanced students are required to make a primitive smoothing tool from found objects. Coiled pots are then smoothed with tool and wet hands.
PART 3: MANIPULATIVE DECORATION
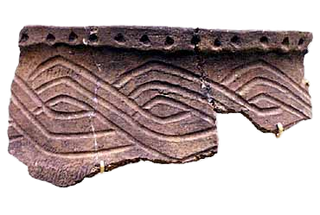
Analogus to art history, the quickest builders in your class will naturally begin to decorate their pots with their tools while the slower builders are still forming their shape. This mimics thousands of years of historical development. Discuss how agriculture enabled “free-time,” allowing the evolution of pottery from purely utilitarian forms to one incorporating artistic expression. Show images of carved pottery such as the shard shown right from the Ohio Historical Society. Remaining time can be used to allow all students to decorate their coil-built pot by pressing and carving into their clay. Pots are left to dry overnight (or longer)
DAY 2
PART 4: SURFACE DECORATION
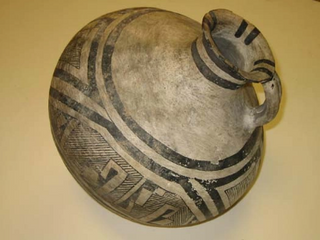
Early decorated pottery is shown from a variety of cultures. Discussion of paint and slip decorating. Young students can paint self-hardening clay pots with acrylic paints. Suggestion: Have your young students paint their pinch pot in a historical style like this Chupadero Black-on-White Olla water jug, circa 1300 A.D (photo courtesy WHITE SANDS MUSEUM.) And then allow them to paint their coil-built pot in their own style. Advanced students should attempt primative decoration with slip, engobe or Terra Sigillata and proceed to kiln or pitfiring.
-End of Lesson

