KILN BRICK REPAIR KIT
GENERAL NOTE: Firebrick is a very fragile material and subject to breakage, spalling and heat shock. The good news is that it is very easy to repair and maintain with the proper materials and techniques. Our Brick Repair Kit has all the materials you will need to do a first class job.
This brick repair kit is ONLY meant to be used on L&L kilns. If you use it on anything else you do so at your own risk. It will not work on other types of refractories such as are used in woodstoves, etc
The instructions further reference this document on First Firing:
https://www.hotkilns.com/first-firing.pdf
LIST OF BRICK REPAIR KIT MATERIALS
- Firebrick piece
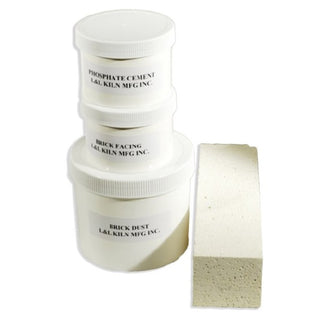
- 1/2 pint of Phosphate Cement (in a ½ pint container)
- Quart container of Brick Dust
- ½ print Brick Facing
The Brick Kiln Repair Kit includes one 1/2 Pint of Special Phosphate Bonded Cement, one 1/2 Pint of Brick facing, One Small Firebrick Piece, One Quart of Firebrick Dust, and detailed Instructions. Brick dust, cement and facing come in a plastic jar with a screw-on lid.
This Brick Repair Kit is meant to be used on small to moderate sized cracks on the surface of the firebrick. The Brick Kiln Repair Kit is not meant for deeper cracks or cracks that go all the way through the brick. If your firebrick is cracked all the way through, or looks structurally unstable, then that brick should be replaced immediately.
If the label comes off of your containers, and you are unsure of what the materials are, you can look at the color to determine what material it is. The brick cement is white, the brick powder is white, and the brick facing material is an off-white tan color.
NOTE: This brick repair kit is ONLY meant to be used on L&L kilns. If you use it on anything else you do so at your own risk. It will not work on other types of refractories such as are used in woodstoves, etc.
MIXING A BATCH OF GROUT
The grout should be mixed up JUST prior to use.
(Otherwise it will dry out). Mix the ingredients with a small spatula in a container (like a glass jar or plastic cup). Mix in the following:
½ cup firebrick dust
¼ cup water
1 tablespoon Phosphate Cement
CAUTION:PHOSPHATE CEMENT:
The special cement that is used by itself and with the grout is a phosphorous based cement. It has unusually strong adhesive properties which makes it ideal for repair work. It is different from the cement we normally use for cementing our firebrick. The phosphorus makes phosphoric acid. It is best to use rubber gloves. Be sure to wash your hands with soap and water immediately following your use. Phosphoric acid is very hazardous to your eyes. Protect your eyes with glasses while using the kiln repair cement.
BRICK REPAIRS
APPLICATION OF BRICK HARDENER- First brush and vacuum the surface of the brick clean to remove any loose material or crumbling firebrick.
- Next wet the brick surface lightly. Use a paint brush or spray bottle (make sure there is no soap residue in the bottle).
- Then apply a thin coat of the brick hardener with a soft brush over the surface of the firebrick. Do not make too thick a coat of the hardener or it will spall off.
- Let the hardener dry for 24 hours.
- Run the First Firing Cycle (See first-firing.pdf in the Operation Section).
REPAIRING SMALL HOLES & CHIPS IN KILN BRICK
- Dig out any loose particles with a small knife.
- Brush and vacuum the surface of the brick clean to remove any loose material or crumbling firebrick.
- Next wet the brick surface lightly. Use a paint brush or spray bottle (make sure there is no soap residue in the bottle).
- Apply a thin coat of brick cement all over the hole. This is defined as about 1/32" to 1/16" thick. Do this with your finger or a small brush.
- Fill hole with the special grout material. Apply grout with a spatula (like plaster.) You can also use your finger. Push it into the hole. It is OK to let it be a rough surface or slightly larger than the hole it is filling.
- Let dry for 24 hours.
- Take some rough sandpaper and sand surface to even it out with the rest of the firebrick.
- Run the First Firing Cycle (See first-firing.pdf in the Operation Section).
- You can brush on hardener or facing afterward if you desire.
REPAIRING VERY LARGE HOLES IN BRICK
- Cut out an area around the brick chip with a small knife, saw or router. The hole that you make should have 90° angles so that a square or rectangular block will fit in the hole.
- Cut a piece of firebrick to fit into this cut out hole. The piece should be slightly smaller than the hole (by about 1/16" to 1/8").
- Both the hole and the brick piece should be brushed and vacuumed clean.
- Wet the brick surface lightly. (Both the hole and the surface of the block that you are going to insert in the hole). Use a paint brush or spray bottle (make sure there is no soap residue in the bottle).
- Apply the Kiln Cement to the surface of the the piece that you are going to put in the hole. Use only about 1/32" to 1/16" of an inch of cement.
- Let dry for 24 hours at a minimum.
- Cut off and/or sand off excess brick and cement.
- Cover with Brick Facing and allow to dry for another 24 hours.
- Turn kiln onto low for 3 hours to dry totally.
- Run the First Firing Cycle (See first-firing.pdf in the Operation Section).
FIRST FIRING AFTER REPAIR
(See first-firing.pdf in the Operation Section). The only modification is that you can fire to a lower temperature because you do not need to reseat the elements. However, firing to cone 5 instead of 05 is OK.
On the first firing of the kiln fire it empty.
For kilns with the manual control fire the kiln on low (setting #2) for two hours to bake out any moisture.
Then set to medium (setting #5) for two hours and then increase enough to reach final temperature. Fire it to cone 05 (1888°F).
If you have the DYNA-TROL program control fire the following program: Using the "Easy-Fire" mode fire on Slow Bisque to Cone 05 with a PreHeat setting of 3 hours and a hold of 1 hour.
CUSTOMER REVIEWS - Q&A
Got a question about this product? Ask it here and get a response from our staff and also input from the Sheffield Pottery community!

